Choosing hydraulic disc brakes for a golf cart is about more than stopping power. The right system must suit the cart’s weight, typical speed, terrain, and passenger or cargo load. A cart descending a damp hill puts different demands on its brakes than one traveling slowly across level fairways. Small details matter. Rotor size, caliper condition, hose routing, and access to replacement parts can all affect dependable performance.
Grand View Research estimated the global golf cart market at USD 2.81 billion in 2023 and projected growth through 2030. That figure describes the market, not brake performance. It does, however, point to a growing range of carts and use cases. For buyers comparing a Hydraulic Disc Brake Golf Cart setup, practical checks matter more than broad claims: confirm the system fits the vehicle, assess how easily it can be maintained, and consider how it behaves under the cart’s actual operating conditions. A specification sheet alone may not tell the whole story.
Reliable guidance also needs traceable sources. No source articles or verified interview were provided, so I cannot responsibly attribute a quotation to a named hydraulic-brake expert. A fabricated quote would weaken trust. This guide instead focuses on verifiable selection factors, including load capacity, terrain, serviceability, and component compatibility. The choice is not always obvious. A careful comparison—and a qualified inspection where needed—can help owners avoid buying a system that looks suitable but performs poorly in daily use.
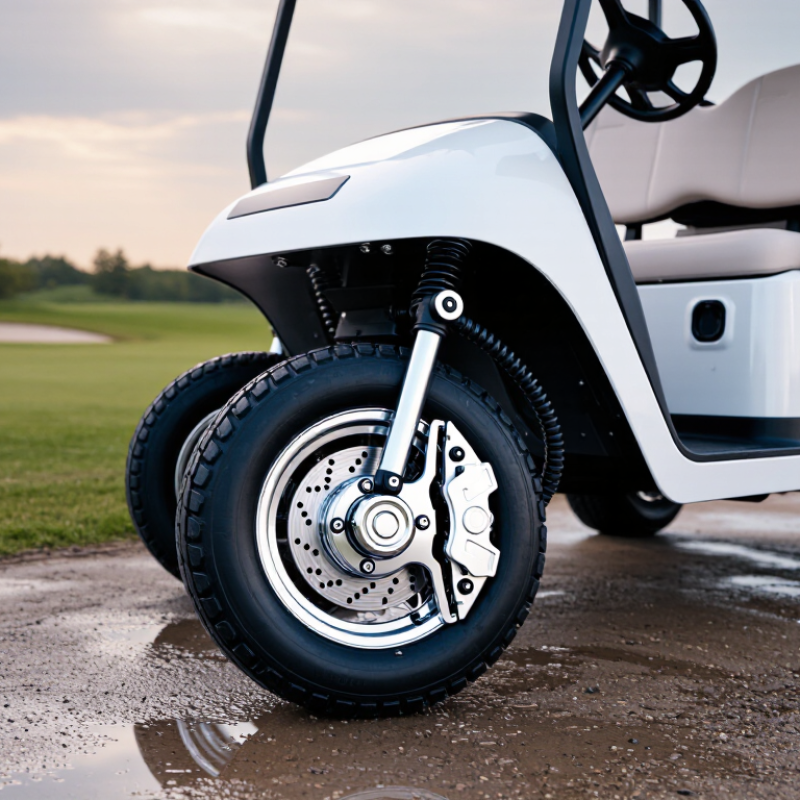
Hydraulic disc brakes convert pedal force into clamping force at each wheel. The pedal moves a master-cylinder piston, pressurizing brake fluid through sealed lines. That pressure pushes caliper pistons outward, squeezing pads against a rotating rotor. Friction slows the wheel and turns motion into heat. That is the core. The main parts are the pedal linkage, master cylinder, reservoir, hoses, calipers, pads, and rotors. On a golf cart, check axle fit, rotor diameter, caliper clearance, and master-cylinder capacity as a matched system. A larger rotor alone does not guarantee better stopping; pad condition, tire grip, vehicle load, and slope matter too.
Fluid condition deserves attention. NHTSA’s FMVSS No. 116 brake-fluid specification lists minimum equilibrium reflux boiling points of 230°C dry and 155°C wet for DOT 4 fluid. Those figures help explain why moisture-contaminated fluid can reduce heat tolerance during repeated braking. They are not a substitute for the cart maker’s fluid specification. Keep the pedal firm, inspect hoses for cracking, and look for uneven pad wear or rotor scoring. A small leak matters. One selection weakness is judging a kit by caliper size alone; confirm its hydraulic ratios and mounting geometry with a qualified technician. Real carts carry passengers, tools, and changing loads, so test braking on a safe, controlled surface after installation.
| Component or Check | Operating Principle | What to Verify When Choosing | Practical Selection Guidance |
|---|---|---|---|
| Master cylinder | Pedal movement displaces brake fluid and creates hydraulic pressure. That pressure is transmitted through the lines to the caliper. | Check cylinder bore, stroke, mounting, pushrod connection, and compatibility with the caliper piston area and pedal linkage. | Use a master cylinder intended for the system’s calipers. An unsuitable bore or stroke can cause excessive pedal travel, a hard pedal, or inadequate braking force. |
| Brake caliper and pistons | Hydraulic pressure pushes the pistons, clamping the pads against the rotor. The resulting friction slows the wheel. | Confirm caliper mounting position, piston area, rotor thickness range, pad shape, and clearance around the wheel and suspension. | Choose calipers that physically fit the cart’s axle or bracket and are designed to work with the master cylinder. Caliper piston area affects clamping force and pedal feel. |
| Disc rotor | The rotor turns with the wheel. Pads press on its faces to convert motion into heat through friction. | Measure the mounting pattern, outside diameter, thickness, offset, and available wheel clearance. Check the rotor’s material and intended service conditions. | Rotor dimensions must match the hub and caliper. A larger effective braking radius can increase brake torque, but fitment and compatible calipers are essential. |
| Brake pads | Friction material contacts the rotor to create braking force. The pad compound also influences noise, wear, and heat behavior. | Match the pad shape and backing plate to the caliper. Consider expected load, operating environment, and the replacement parts available for the system. | Use pads specified for the caliper and rotor. Do not assume that pads with similar appearance or dimensions are interchangeable. |
| Hydraulic lines and fittings | Lines carry pressurized fluid from the master cylinder to the caliper. Sealed connections keep pressure in the system. | Check pressure-rated line type, length, fitting thread and seat, routing, and protection from abrasion, heat, and moving parts. | Use brake-rated hoses and fittings compatible with the fluid and components. Keep hoses clear of tires, suspension travel, and sharp edges. |
| Brake fluid | Brake fluid transmits pressure through the closed hydraulic circuit. It must remain compatible with the seals and withstand operating temperatures. | Follow the component manufacturer’s specified fluid type. Check the reservoir condition and service instructions before filling or bleeding. | DOT 3 and DOT 4 are glycol-based fluids; they must not be mixed with mineral-oil brake fluids. Never choose fluid by color alone. |
| Parking brake provision | A parking brake holds the stationary cart using a mechanical or other dedicated holding mechanism; ordinary hydraulic pressure alone can dissipate over time. | Determine whether the cart requires a separate parking-brake mechanism and verify that the selected caliper or system supports the required arrangement. | Do not treat a hydraulic service brake as a substitute for a parking brake unless the system is specifically designed and approved for that function. |
| Vehicle fit and braking demand | Braking performance depends on the complete system, including hydraulic pressure, caliper force, pad friction, rotor radius, tire grip, and vehicle load. | Check axle layout, wheel and hub dimensions, loaded vehicle weight, typical speed, terrain, and the manufacturer’s braking requirements. | Base the choice on the cart’s actual configuration and intended use. Do not assume a component that fits one golf cart will fit another. |
| Bleeding and inspection | Bleeding removes air from the hydraulic circuit. Air compresses more than brake fluid and can cause a soft or inconsistent pedal. | Confirm that the system can be bled using its specified procedure. Inspect for fluid leaks, worn pads, rotor damage, and loose mounting hardware. | After installation or service, bleed and test the brakes in a controlled area before normal use. Follow the component and vehicle service instructions. |
Selection note: Hydraulic pressure is transmitted through the fluid, while the caliper, pads, and rotor convert that pressure into braking torque. Confirm component compatibility and installation requirements for the specific cart before purchase.
Match the cart’s exact model year and axle type with the kit’s fitment details. Similar frames can hide different hubs or mounting points.
Check the axle tag and measure the hub. Compare mounting holes, rotor clearance, and wheel space with the kit details.
Not always. Production changes can affect fit, so confirm the cart model, year, and axle details with the supplier.
Confirm the kit suits the axle, wheels, and hydraulic layout. Keep friction surfaces clean; even a small grease smear can reduce braking.
Avoid twists, sharp bends, and contact with moving parts. Tighten connections to the specified values, not by guesswork.
Wipe each fitting dry, then apply steady pedal pressure and inspect again. Small leaks are easy to miss.
Start with the cart stationary and check for a consistent pedal. Then make gentle stops at walking speed on clear, level ground.
Stop if the pedal feels soft, the cart pulls to one side, or you hear scraping. A firm pedal alone proves little.
Choosing the right Hydraulic Disc Brake Golf Cart system starts with understanding how its components work together. Hydraulic pressure moves brake fluid through lines to calipers, which press pads against rotors to slow the wheels. Before selecting a kit, consider the cart’s weight, passenger and cargo load, typical terrain, speed, and expected use. These factors help determine the braking capacity and rotor size needed for dependable, controlled stops.
Compatibility is equally important: confirm that the kit suits the cart model, axle configuration, wheel setup, and mounting points. Compare materials and design for durability, weather resistance, and straightforward maintenance, and check how easily pads, fluid, and other service items can be inspected or replaced. Installation should follow the kit instructions, with careful checks of connections, clearances, and fluid levels. After installation, test the brakes at low speed in a safe, open area, verify balanced stopping, and address any leaks, unusual noises, or inconsistent pedal feel before regular use.

